Viewing files in the GAC

It doesn’t happen often, but occasionally I need to copy dlls from the GAC. The problem is that for assemblies prior to .NET 4.0 the contents of the GAC are hidden from explorer by a shell script. I’ve seen a number of solutions to this. Most of them are a bit clunky, but this is the one I like the best.

Open a new command prompt, and enter subst z: c:\windows\assembly

This will map drive z (pick a mor suitable drive letter if you like, of course) to the GAC folder. Doing so bypasses the shell script, allowing you to browse it in explorer just like any other folder.

To remove the drive mapping simply use the command subst z: /d

Addendum

Something to be aware of is that if you call subst from a cmd window with admin privileges, you won’t be able to access the mapped drive from an explorer window. So don’t do that.

A couple of notes on using Endjin’s Templify

I’ve been working on an internal project which uses Endjin’s Templify. For those not familiar with Templify, it’s a handy piece of software which tokenises (or templifies, to use their parlance) keywords within solutions such that they can be used as templates for new solutions. What I’ve been working on is a server-based implementation of Templify that works with our CI server to allow us to centrally maintain templates. This ensures everyone’s working with the latest version and avoids having to update template packages locally. I ran into a couple of interesting points while doing this, which I think are worth documenting.

Choose tokens carefully

I had initially used the same word for the package name and the token. This was pleasingly consistent, however it caused Templify to break. The problem turned out to be with the manifest.xml file that Templify generates. This file lists all files included in the template along with some Templify metadata, such as its package name and tokens. This file is itself tokenised as part of the Templify process, so if the package name is the same as the token, it too gets tokenised. This results in Templify being unable to deploy the package after its creation. So the lesson here is to make sure the package name is not the same (or does not contain) any of the tokens.

Configuration path

This one isn’t something that’s likely to cause a problem for general usage of Templify, but it was a pain for me. The installer for Templify offers no option to install for all users, and only installs for the current user. This presented a problem when running on our CI server under credentials specially created for the purpose, as Templify will attempt to read its configuration from the current user’s profile directory. Unfortunately the configuration file doesn’t exist for that user profile, but instead of failing completely it gives rise to some odd behaviour.

What happens is this: Templify maintains a list of files to exclude in its configuration file. These files are deleted from the package prior to tokenisation. However if the configuration file is missing, it reads the exclusion list as string.empty, which results in all tokenised files and directories being deleted as exclusions. Whoops! Fortunately this is easily remedied by copying the configuration from the profile it was installed under to the profile of the user you want to run it under. The default location is C:\Users\$USER\AppData\Roaming\endjin\Templify\config

EPiServer CMS 7.5 Clean Database Setup

EPiServer have been making some great improvements to the setup of new sites lately. There’s now no need to wrestle with the Deployment Center. Using the latest EPiServer CMS Visual Studio Extension creating a shiny new CMS 7.6.3 project is a simple matter of choosing between and MVC and Web Forms and pressing a button. This will create a preconfigured site in Visual Studio, with the only remaining tasks being to create a site in IIS and attach the supplied database.

Supplied database?

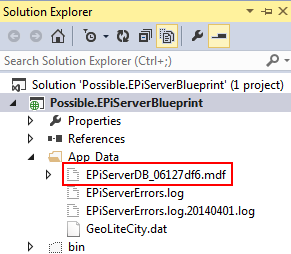
That’s right, within the App_Data folder is an .mdf file comprising the site’s database. Naturally it isn’t included as part of the solution:

EPiServer default database file

Empty EPiServer database .mdf file. There’s also an .ldf file, collapsed from view under the .mdf here by Visual Studio.

The template installs (at the time of writing) the version 7.6.3 Nuget packages, but there aren’t any database changes between versions 7.5.394.2 and 7.6.3.0 that I’m aware of. Feel free to correct me if I’m wrong.

However there’s a catch. There isn’t always a catch, but sometimes it can certainly seem that way. In this case it’s that the supplied database was created in SQL Server 2012, and 2012 databases cannot be ported back to earlier versions. This was a problem for me as our infrastructure runs mostly on SQL Server 2008R2. I suspect this is the case for a lot of people.

This was frustrating as it was standing in the way of having a nice easy setup process for new projects. The only thing to do was to roll up my sleeves and figure out where that sample database came from. This involved some tedious digging through the Visual Studio Extension’s.vsix file (it’s just an archive) the details of which I’ll spare you in favour of the highlights

Hooray there’s a script

I was concerned when I started looking that I’d find the .mdf file plainly archived in the .vsix. That would have been a disappointing dead end. However there was no sign of it, so it was either being supplied by one of the included Nuget packages (which would have also been a dead end) or created from a SQL script. It was of course the latter, inside EPiServer.CMS.Core.7.6.3.nupkg, in the tools folder: EPiServer.Cms.Core.sql.

Hopefully, I thought, I would just be able to run this script on a new database and we’ll be off.

Boo there’s a catch

The catch this time is that the script doesn’t contain everything you need. The database it created resulted in the error Missing stored procedure “RetrieveNonblockingInstanceStateIds” when I tried to use it with the new project. This is related to Windows Workflow Foundation, which requires some objects creating in the database. As these aren’t part of EPiServer itself, they weren’t included in EPiServer.Cms.Core.sql. However fortunately they are available to us in %WINDIR%\Microsoft.NET\Framework\v4.0.30319\SQL\en. Simply the following two scripts (in order) against the EPiServer database:

  • SqlPersistenceService_Schema.sql
  • SqlPersistenceService_Logic.sql

So we’re done, right?

Yes, I do believe that’s all that’s required to get a fresh database created. Here’s a zip containing all three required scripts. Just remember to run SqlPersistenceService_Schema.sql before SqlPersistenceService_Logic.sql and all should be well.

If however all is not well, please let me know as (there’s that catch again!) it hasn’t been thoroughly tested yet, but it seems sound in principle.

Coding Sins – a node.js Twitterbot

I’m a back-end developer, and a friend of mind who lives primarily in the front-end world has repeatedly enthused to me about node.js. I should try it, he insists, because it’s really cool. Of course I’ll try it, I maintain, whenever I find the time.

Finding the time for pet projects amongst the busy demands of keeping up with my back-end world, my writing, having a social life and the general day-to-day duties of the modern world is always tricky. So it took one of the latter tasks (specifically, cleaning the bathroom) to get me to pick up node.js. To be honest anything would have been preferable to scrubbing out the bath, and this seemed like a more productive use of my time than trawling my way through r/funny.

Making nodes is easy

Actually setting node.js up (on Windows) was a doddle. Just run the installer, and you’re done. I opened the node command prompt and tried console.log(‘Hello’). It worked. Next came the trickier part.

What’s it all aBot?

I needed a clear goal for my bot. Something I’ve seen before are bots which watch the twitter stream for particular words, hashtags or mentions and tweet a reply. This seemed like something achievable, so I created a new Twitter account called Coding Sins. The idea is that whenever someone has committed a coding sin, such as not writing a unit test they’d intended to write, or broken the build, they tweet their sin @codingsins, which will then reply with a random message. Mostly it absolves sins, but sometimes not.

A Pea Eye

In order for my bot to be able to monitor the stream and post tweets, it needs access to Twitter’s API. To get this, I needed to create a Twitter Application. The end result of this process is the key, secrets and token required for OAuth login, so that my node.js application can access the API. Registering a Twitter app is very straightforward, although there are a few points worth bearing in mind:

  • You need to register it using the same account as your app will be using to tweet. That’s how the two are linked.
  • You’ll need read and write permissions to tweet. The default setting is read only, but the option to change permissions is on the tab after the option to create an access token, which can be misleading as the natural impulse is to work through the tabs in order. Change the permissions THEN create the token. A bit of googling revealed I’m far from alone in being tripped up by this. It’s obvious in retrospect, but was confusing at the time.
  • Twitter’s settings have quite a high latency. When you change settings, it’s not unusual for them to appear unchanged at first. Give it a few seconds, then refresh.

Look, I thought this was a node.js post. Where’s the node.js stuff, eh?

Fine, we’re now ready to code some node. Before I dive in though (I know, get on with it!) a couple of credits are due:

  • The starting point for my code was taken from Sugendran’s simple tweet bot. I modified it for my purposes.
  • Sugendran’s code uses Tuiter, which is a node module that exposes the Twitter API. I found it excellent as it allowed me to simply consult the Twitter API’s documentation for implementation.

Anyway, here’s the whole Twitterbot node.js script:

var conf = {
	keys: {
	    consumer_key: 'xxxx',
	    consumer_secret: 'xxxx',
	    access_token_key: 'xxxx',
	    access_token_secret: 'xxxx'
	},
	terms: ['@codingsins']
};

// We're using the tuiter node module to access the twitter API
var tu = require('tuiter')(conf.keys);

// This is called after attempting to tweet. 
// If it fails there isn't much we can do apart from log it to the console for debugging
function onTweeted(err) {
    console.log('tu.update complete')
    if(err) {
        console.error("tweeting failed");
        console.error(err);
    }
}

// This is called when a matching tweet is found in the stream
function onTweet(tweet) {

    console.log("Replying to this tweet: " + tweet.text);
    console.log("Screen name: " + tweet.user.screen_name);

    // Note we're using the id_str property since javascript is not accurate for 64 bit integers
    tu.update({
	status: '@' + tweet.user.screen_name + ' ' + getRandomMessage(),
        in_reply_to_status_id: tweet.id_str
    }, onTweeted);
    console.log('tu.update called');
}

// This listens to a twitter stream with the filter that is in the config
tu.filter({
    track: conf.terms
}, function(stream) {
    console.log("listening to stream");
    stream.on('tweet', onTweet);
});

// This contains our collection of messages and selects one at random
function getRandomMessage() {
    var messages = new Array(
        'Message 1.',
        'Message 2.',
        'Etc'
    )
    return messages[Math.floor(Math.random()*messages.length)];
}

I’ve xxxx’d out the OAuth config as that needs to be kept a secret between my script, my twitter application and myself. Also, in the interests of keeping some mystery about the bot, I’ve not included the actual messages it tweets.

The two main points of interest here are:

  • The tu.filter call. This uses Twitter’ streaming API to give a stream of tweets filtered by whatever was defined in the config, which in this case is @codingsins. Note that when filtering the stream, everything is essentially text. Filtering for screen names is just the same as filtering for, say, hash tags, or indeed anything else.
  • The onTweet function. This is called in response to any tweets appearing in the filtered stream. It uses Twitter’s RESTful API to tweet a random message in reply.

Before running the script, the tuiter module needs installing. Handily, node.js comes with an incredibly easy package manager. All that needs doing is to fire up the command prompt and enter:

npm install tuiter

It’ll output a bunch of lines summarising what it’s doing and then we’re good to go.

Running the script is simply a matter of saving it as a .js file (eg codingsins.js) and starting it from the command line like this:

node codingsins.js

That works fine in Linuxland, but in windows you’ll need to type node.exe instead of node, or it’ll shit the bed. Or at least fail with an error message.

The icing on the node.js cake is keeping the application running through crashes and restarts. There are a few tools out there to achieve this, but I used Forever, mainly because it was already installed on the server I used to host the application. Getting it up and running, er, forever was simply a matter of SSHing into the server and entering this:

forever start codingsins.js

Confess

That’s it! All in all I was impressed with how relatively easy this was to accomplish. From a half-hearted start born of avoiding cleaning the bathroom on a Saturday afternoon, it took me until around nine o’clock to have a working node.js Twitterbot.

If you want to give it a try, tweet your coding sin @codingsins and await your judgement.

Here’s a mouse riding a node toad:

Mouse Riding Toad

Choosing your own adventure.

Recently I decided to write an Android app. This isn’t a completely crazy idea as I’m a web developer by trade. I wanted to do this partly to have a pet programming project outside of work, and partly because my fiction writing had got stuck in a bit of a rut so I figured I’d take a break from it. Then, perhaps because of the second point I hit on the idea of the app being essentially a choose your own adventure game.

I didn’t have anything ambitious in mind. Certainly not anything as involved as the legendary (and recently revived) Fighting Fantasy books of my youth. However it proved to be a bigger undertaking than I’d anticipated.

When in doubt, draw a picture

The choose your own adventure format strongly invites the creation of a flow diagram. At first I thought a single flow diagram would suffice, but once I started contemplating putting dry-wipe tape on the walls I realised I needed to rethink matters. So I used the programmer part of my brain and split the work into discrete chunks. More specifically, I made the decision to make the adventure a series of linked areas, each of which had their own diagram. This allowed me to  write flow diagrams with only 20-40 boxes, then link them together at their entrances and exits. I’d recommend the same approach to anyone else taking on the same task.

Micro writing

At first the writing was purely about fun. Unlike more conventional fiction writing, I felt no responsibility to traditional flow and narrative. Each page, for want of a better word, was a brief description. There was a lot of scope to just have fun with both the format and the language, and the slightly unpredictable way a reader could work their way through the pages made a mockery of linear narrative. It was mostly about one-liners, and in that respect it was fun to just write something nicely without worrying about how it would work with the rest of the story.

Macro writing

Naturally it wasn’t that simple in the long run. Writing amusingly around the flow diagrams was important to get the puzzles, such as they are, implemented. However I also wanted to have a larger narrative in play, so the reader gets a sense of a story while working their way through the application. This was difficult because there’s no guaranteed route through the pages.

I’ve played quite a few computer games in my time, and am quite familiar with the technique of found information. This is where in the course of playing the game you discover objects which fill in a piece of the game’s story. This works particularly well in linear games where the player progresses through levels. However I’d already made the decision to allow the discrete areas of the app to be accessed in any order, so I couldn’t rely on that to keep the narrative in order.

Shotgun!

I settled on what I think of as a shotgun approach. I can’t hit the target dead-on every time, so instead I aim to cover it randomly enough times that the player will see enough of the pieces to get the narrative even though it’s received piecemeal.  I aimed to do this via a combination of some guaranteed story telling in the early part of the app so that what follows isn’t completely unfamiliar, and randomly discovered bits of information which add to it. I’m not entirely sure how successful the approach is, but it strikes me as something which can work. The tricky part is knowing how many of the pages should include portions of narrative. I hope to find out from feedback from the app itself. To some extent it mirrors a challenge of traditional narrative, which is how to write just leanly enough to keep the reader on their toes without confusing them.

You have not been eaten by a grue

Overall I’m glad I took on this project. From a purely writing point of view I’ve enjoyed the freedom from writing to the standard linear format. However it’s also made me think a lot more about that same format. It’s made me think about how much information is required to get a story without it being obvious from a different perspective. And that’s something I can’t wait to consider in more detail when I start writing my next short story.

You can download the app Google Play. It’s free!

Here’s a photo of a mouse on a swing:

mouse_in_swing

(Although it might be a hamster)

I Decided To Write an Android App

By trade I’m an ASP.Net / C# developer. I spend most of the working week inside Visual Studio. Occasionally I get old skool and bust out SQL Server Management Studio in order to bother some data more directly. It wasn’t always like that however. In the past I’ve worked with PHP, and a long time ago I spent most of my time plugging away in classic ASP’s VBScript. A few times I’ve even been known to do some Java. Well, just enough to be dangerous, as they say.

I own an Android phone, so rather than go down the more natural Windows Phone development route, I thought I’d dust off my Java skills (a very careful dusting as they’re somewhat fragile) and write an Android app.

What is it?

That’s a good question. I know what it is now and I’ll tell you shortly, but when I set out to make an app I didn’t really have anything particular in mind. I certainly didn’t have some inspired cash-cow at the ready. So I sat down and tried to figure out what I wanted to do. It seemed to me that I had two main goals for the app:

  • It had to be fairly simple so I wouldn’t get bogged down in complexity on my first attempt.
  • It had to be somewhat silly.

The second point was largely to differentiate it from my day job. Not that the day job isn’t fun sometimes, but if I was going to motivate myself to finish this in what little spare time I have, I had to hang my serious hat up as soon as I got back to my flat.

User hostility

At first I thought it would be funny to make something slightly hostile. I had the idea of an app that purports to help people find lost keys, but which actually berates them for losing them in the first place. Then I realised I was being a dick, so I didn’t do that. The idea of of an app to find keys was good though. The only problem was, as a practical app it was quite impossible.

After talking with a friend I began to like the idea of making a choose your own adventure sort of experience behind the pretence of an app that can find keys might be fun. This ticked an extra box with me as it would allow me to not only write an app, but also write some fiction, albeit in a format I’ve little experience writing. That side of it would prove to be more work than anticipated, which I’ve covered in a separate blog post.

Where are my fucking keys?

That was the working title for the app. At the time I thought it was funny, but at the back of my mind I realised it probably wouldn’t survive into the app store. So now it is known less offensively as Sheepless Key Finder. The sheepless part does have relevance to what thinly passes as narrative in the app.

It’s fair to say that the app took longer to write than I initially thought. Some of that was how much planning and writing the adventury bit needed. The rest was at first simply getting stuck on implementation, but later it turned out I have quite a flair for scope creep. There was always another little bit I wanted to add. But eventually it was done.

Was it worth it?

It was never going to make me rich so the only measure of its success I have is whether I feel it was worthwhile taking the time and effort to write it. Well, I’m happy to say that yes, it was. I’ve learned how to write a fairly basic Android app, but in doing so I now have a good appreciation of how to use the framework and would feel quite confident about writing another, completely different app. I may go into the technical details in another blog post, but I’d like to summarise a few points here in conclusion:

  • Java, while similar to C#, is not C#. I knew this before of course, but also, shhhhh – it’s not that different to C# really.
  • The Android framework is pretty well thought out, with Activities naturally separating  concerns without too much effort.
  • I still don’t like Eclipse as much as Visual Studio, but debugging worked well enough for me.
  • The Dalvik VM was horrifically slow when I first started, but after an update it’s much, much faster. The VM management is also quite nice to use. It was easy to make a range of VMs covering different screen sizes and densities.
  • Debugging on my phone itself was a doddle. I was expecting to have to jump through many hoops to get it working, but essentially all I had to do was plug my phone in and pick it as a target when debugging. Lovely!
  • That said I did have one annoying issue where a VM got screwed up and had to be deleted. Grrr.
  • Signing the app is actually very straightforward, but one crucial step is a bit ambiguous and caused me some strife.
  • Actually running the finished app on my phone felt nice.

You can download the app Google Play. It’s free!

Here’s a sheep wearing a hat:

animalia_sheep

Disabling the cache in Chrome

I like Chrome a lot. I especially like its developer tools, which finally persuaded me to leave Firefox and Firebug behind. However one thing which persistently bugs me is how aggressively it caches assets. Generally speaking, its caching is excellent. We don’t want to be retrieving files when we already have them cached. During development this is something of a pain in the arse, as I have to fight against the cache to see updates to, say, javascript files.

One way around this that I sometimes see proposed as a solution in to version javascript files, ie include a version number in their filename. This does ensure that the browser will always retrieve the latest copy of the file, but it’s not great when actually developing. Having to increment the version just to add a console.log statement, for example, isn’t great, and arguably slower than just clearing the cache every time. In fact clearing the cache isn’t all that hard. I’ve collected a few methods together as I see this is something that a lot of people are frustrated by.

Keyboard Shortcut

CTRL-SHIFT-DEL. Job done, you cunning swine. Take the afternoon off!

Network Tab

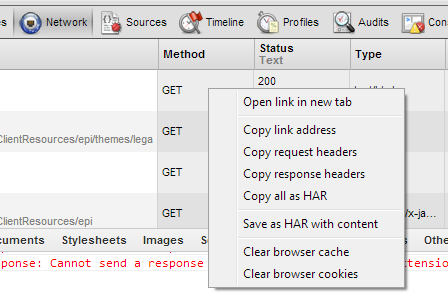
Right-clicking in the Developer Tools Network tab gives an option to clear the cache. Like this:

Kill it. Kill it with fire

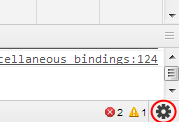
Alternatively, just disable the damned thing altogether. This is available via the often-overlooked Settings for Chrome’s Developer Tools. To access these, click the little cog at the bottom right of Developer Tools, as circled below:

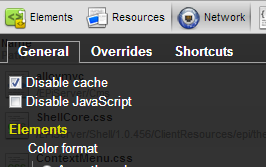
Then, on the General tab, there’s an option to disable the cache:

Check that, and you’re golden. Take the rest of the week off. Hell, quit your job! It can’t possibly get better than this.

Here’s a skateboarding duck:

EPiServer Access Rights Wrongness

Recently I had a bug raised on an EPiServer build which described an error message I’d never seen before. When attempting to assigned new group rights to a particular branch of the page tree, the admin user was faced with this error message:

After reflecting the code out I found the error message in a catch block around a database transaction. To understand what was happening, it’s necessary to have a bit of knowledge about how EPiServer manages its access rights.

What lies beneath

tblAccess

This table keeps track of user/group access rights. It contains records for each user and group stored against a page id. Crucially, the page id has a constraint on it – the page must exist in tblPage. This was the underlying cause of the error message – a non-existent page id was being inserted into the table. But how could that happen?

tblTree

This table describes the page hierarchy. It records the page id of a page against the page id of its children, along with an integer indicating the level of nesting. When access rights for a branch of the pagetree are updated, two things happen:

1) The current rights for the user/group are removed from tblAccess. The records are deleted using a set of records from tblTree as a master list of pages included in the branch.

2) New rights for the user/group are assigned. These are written to tblAccess, again using a set of page ids obtained from tblTree. However, there is no constraint on tblTree. As a result, the table can contain a page id for a non-existent page. The upshot of this is that when tblAccess is updated, it attempts to write an invalid page id, which fails, resulting in the error message above.

This should never happen

Although tblTree should ideally have a constraint on it, the above scenario should never happen. Left to its own devices EPiServer will take care of its table structure, so the situation decsribed here looks like the result of a manual database manipulation. Someone, at some point, has hand-deleted some pages. This illustrates the pitfalls of directly manipulating CMS data nicely – table constraints will have led the way to deleting all references to the deleted pages, but tblTree has been missed. This is a lesson we should all know already, but it never hurts to be reminded why the lesson exists.

Enumerations, Bitwise Operators, Shiftiness

I like enumerations. They’re really useful for writing clear code and they’re also really easy to use. Like this:

public enum TvChannels
{
    BbcOne = 0,
    BbcTwo = 1,
    ItvOne = 2,
    ChannelFour = 3
}

Right?

Wrong. Enumerations can be decorated with the [Flags] attribute, which allows them to be combined. This allows them to be grouped together:

var BbcChannels = TvChannels.BbcOne | TvChannels.BbcTwo

The variable BbcChannels is defined as a bitwise OR between BbcOne and BbcTwo. The way we previously defined our enum values presents a problem however. The values must be multiples of two, otherwise the bitwise operations will yield incorrect results. The enumeration should instead be defined as follows:

public enum TvChannels
{
    None = 0
    BbcOne = 1,
    BbcTwo = 2,
    ItvOne = 4,
    ChannelFour = 8
}

There are two points to note here.

Firstly, the multiples of two allow the OR operations to work. In binary, the value of BbcOne is 0001, and that of BbcTwo is 0010. The result of an OR operation between the two (defining the variable BbcChannels) is then 0011.

This allows us to then check the BbcChannels for other enumeration values, eg

var IsBbcChannel = (BbcChannels & TvChannels.BbcOne) == TvChannels.BbcOne

This will be True, because the bitwise AND between BbcChannels (0011) and BbcOne (0001) is 0001 – ie equal to BbcOne.

The second point is that we have introduced a value of None = 0 at the start of the enumeration. This is because a value of zero cannot be tested for using a bitwise AND in the same way as in the example above; the result would always be zero.

Finally, a bitshift operator can be used to make the enumeration a bit nicer to look at. Because we’re assigning specific bits to each successive element in the enumeration, we can simply bit shift to the left by the appropriate number of times:

public enum TvChannels
{
    None = 0
    BbcOne = 1 << 0,
    BbcTwo = 1 << 1,
    ItvOne = 1 << 2,
    ChannelFour = 1 << 3
}

Lovely.

Here’s a photo of a rabbit with a cup on its head:

BDD

Behaviour Driven Development. Not to be confused with Development Driven Behaviour, which can include head-to-desk interfaces, angrily strong typing and substance dependency injection.